
It’s snowing today, which means Christmas must be coming soon! I can’t think of a better way to get into the holiday spirit than to create a Christmas junk journal, so that is exactly what we are going to share today.
Why Make a Christmas Junk Journal?
I love making junk journals any time of the year, but Christmas for me especially is a good time to make them.
Christmas can sometimes be a complicated mess of emotions, so for me a junk journal helps one feel merry and bright even when life might be bleak.
Junk Journaling is fun, relaxing, and it makes it a lot easier to remember and think about all of the GOOD things about Christmas.
I like to make Christmas art journals and junk journal projects early in the season. This way I can continue to fill them for the next month or two with different things I gather from different events and things happening.

This journal is a great “start” – I know it will still be many more weeks before it even comes close to being full!
One of the things I love about junk journals is they truly are never really “done” – even when you have it stuffed full of papers and art and notes, you can always add to it.
Fortunately, this time of year usually means lots of different events and things happening between friends, family, and the kid’s school events – and that of course means a LOT of opportunities for Christmas themed junk journal ephemera!
This is another reason that makes these notebooks great for the holidays. It gives you a way to keep and display all the little things you might collect and not otherwise know what to do with throughout the season.
If you have a crafty person in your life you love, these Christmas junk journals also make for great gifts.
You can even optionally tuck in envelopes and full with goodies the person likes, such as packets of tea, hot chocolate, candy, or even gift cards. If it’s flat and fits in an envelope it will work!
I also just like to make these kinds of journals to use as part of the Christmas decorations. They are a great way to display cards you’ve gotten through the years or even show off a little holiday art without having to redecorate all of the walls.
They are also fun to use as art journals – you can use it as the perfect excuse to paint all sorts of things in a journal you might not normally paint.
Snowmen, Santa Claus, Christmas trees, angels, snow covered cityscapes, wreaths, bells, candy canes – And of course, we also have our list of Christmas Journal Prompts to inspire you for even more ideas!
How to Make a Christmas Junk Journal
These Christmas junk journals are simple and easy to make. It is made with cardboard and whatever you may already have at home. You don’t need any special supplies, and you can assemble the basic part of the journal in about 10 minutes once you have all of your supplies gathered.
Step 1: Gather Supplies
In these journals, I used a large piece of cardboard, folded in the middle to create a book spine. Then we use ribbon, twine, yarn, and elastic bands to keep all of the papers in place.
Here’s what you’ll need to make these journals:
1 Piece of Cardboard: The cardboard is what we use to make the cover. We’ll be folding it in threes so it makes for a book cover. Mine measured around 16 inches x 10 inches so that the journal size is 7 x 10 when complete and it has a 2″ spine. You can always trim your papers smaller if you want a different size.
3-4 yards of assorted Ribbon/Twine/Lace/Yarn: You can use as little or as much ribbon/yarn as you would like to tie in your pages in the journal. This is a no sew journal, but I like to tie a lot of yarn and ribbon around the pages into the cover. This helps add reinforcement to make sure the pages stay in place.
Elastic Bands: I only used one elastic band in this journal, but I sure wish I had two or three more to keep those signatures in place! Big elastic bands {most commonly sold as hair accessory headbands} work so well for keeping pages in place.
You can order them in all sorts of colors like this set on Amazon. Most stores sell the plain black ones – I’ve even seen them at the Dollar Store a few times. The elastic bands are completely optional, but they are nice to have, especially if you like making no-sew junk journals.
Junk Journal Papers & Christmas Themed Ephemera: I used mostly leftover Christmas scrapbook paper that I bought on sale a few eons ago. The scrapbook paper I have is only single sided, so many of the papers I glued together and then trimmed them down. You’ll want to trim your papers so that you can fold them.
For example, if you are making a 6″x9″ journal, you would want most of your papers to be about 12″ x 9″ long so that they’ll be 6×9 when folded. Of course, you can always use assorted shapes and sizes of paper, too.
Pens, Markers, Stamps, Stencils, Paint, Etc.: Once we get all of our papers secured in place in the journal, it’s time for the fun part! Dust off those stamps, get out the pens and markers and paint – whatever you have and whatever you like to work with.
Step 2: Prep the Cover
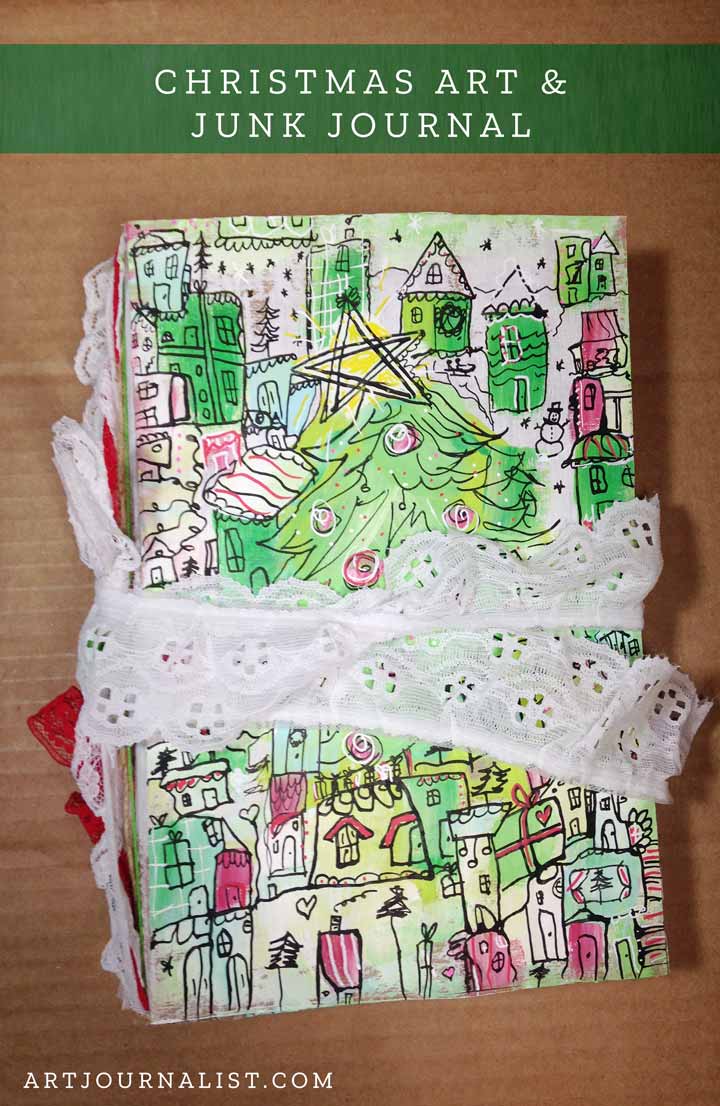
To make my journal, I simply used a large piece of cardboard from a box and trimmed it down to size. I covered my cardboard in a light and haphazard coat of gesso. I was seriously tempted to just leave it like that – sort of like an iced gingerbread type of effect.

Of course, later I was more seriously tempted to paint all over it, and so that is what I ended up doing.
I do really like the iced gingerbread look a lot, I just have zero discipline when it comes to not covering things in paint! I’m sure some of you may be able to relate!
If you don’t want to paint, you can of course always cover it in paper or washi tape. However you like to decorate the cover of your journal will be perfect.
Step 3: Fold & Trim Papers to Create Signatures

I had a lot of Christmas themed scrapbook paper I was eager to use because I have had it for eons. I used mostly these papers to create the main pages of the book.
The scrapbook paper I had was only one sided and very thin, so for most of the papers I used a glue stick to glue them together and then I trimmed them down.
You don’t have to buy anything to make this journal, BUT…If you ARE going to buy scrapbook paper, I recommend getting something that is double sided. It will save you a lot of time later and puts a lot less pressure on you to make sure you put something on every page.
This pack of Echo Park papers are super cute and come with stickers! These papers by Carta Bella are also double sided patterned cardstock.


Signatures are basically groups of paper folded together. I made 3 signatures, and each signature had about 7-10 papers folded together.
You can do some pretty neat things by the way you fold papers. For example, you don’t have to fold them in half – you can fold them in thirds. You can also layer different papers so that they fold into each other in different ways.
That is the beautiful thing about these no-sew journals and the way they are made – you can reposition all of the pages later at any point.
Step 4: Tie The Papers Into the Cover

For this step, we’re simply going to tie all of the signatures into the cover. This is where those elastic headbands come in very handy, but if you don’t have those no worries. Yarn, string, and twine will all work just fine.
Once all the three signatures are tied in, you will likely want to add some reinforcement. This not only helps keep the pages in place, but adds a nice decorative border to the spine of the book also.
I used a mix of embroidery floss, ribbon, lace trim and jute twine. It’s what I had – and it worked just fine. If you have any pieces of ribbon that are long, you can actually weave it around the book and in different parts in many ways. This is what I did with the lace trim, since I had a nice long piece of it and I didn’t want to cut it.
I also decided my journal needed a piece of lace to use as a closure to wrap around the book. This is simple to do – just tuck it in under the yarn/ribbon/elastics on the spine and then you can just wrap it around and tie as desired.
At this point, your journal is now ready for the fun part – filling it up with all your favorite things and artwork!
Ideas for Filling the Holiday Journal
Once the journal is made, you’re ready to fill it up with all sorts of fun things.
I used a bunch of magazine cut-outs from some very vintage decorative painting magazines and garden magazines I rescued from the dumpster.

I also did a bunch of doodling. For most of the doodles I just used a Micron 01 pen and my trusty Uni Posca paint markers.
Christmas trees are very fun and easy to doodle. My husband said it best when I was showing him my journal. “It looks like something I would have drawn when I was a kid…”

That is the magic of Christmas though, isn’t it? Everyone knows Christmas is most fun with a little bit of childhood and playfulness mixed in.
Something else I had fun playing with were some of my kid’s old stamps. These stamps are very vintage, I’m pretty sure they came from a set of old Crayola stamps that might have even been my very first set of stamps made in the 90’s.

I don’t really have a lot of stamps, so most of my stamps aren’t really Christmas themed.
It’s also been a few years since I’ve replenished my ink stock. I may just have to ask Santa for some new distress inks this year. {Although a Cricut Maker is also on the list…decisions, decisions! }


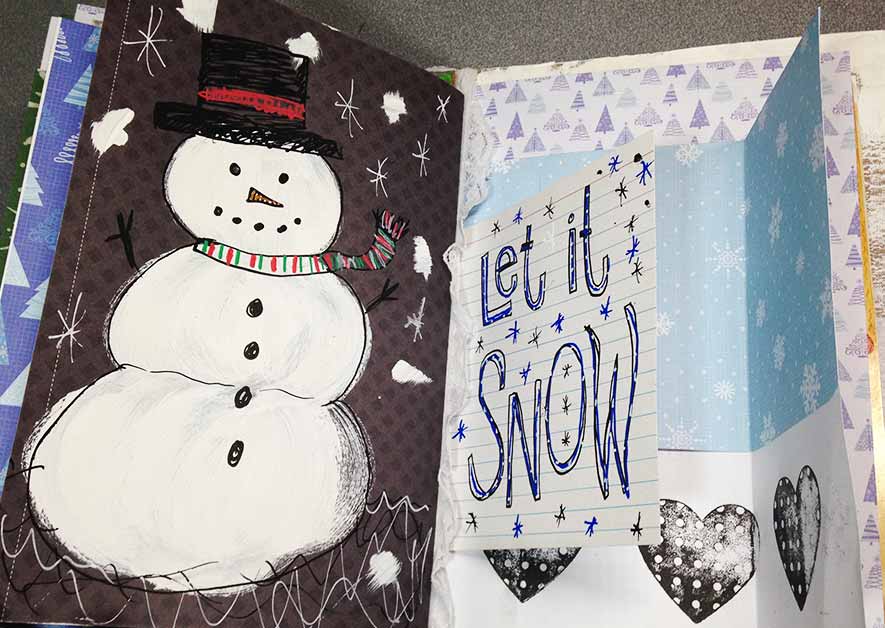
Next I decided to make some art pages in the journal. I made a couple of different styles of pages. Snowmen are right up there with Christmas trees on the list of “fun and playful happy things that are easy to paint”.
One of the papers in my scrapbook paper pile had these banner shapes you could cut out. I decided rather than use it as a banner, the individual banner flags would would make for perfect triangle Christmas trees. Then I just doodled and painted around them.

In case you haven’t noticed a theme yet, I really like trees! Here’s yet another Christmas tree page. This one was done in acrylics and ink. It’s starting to get messy in here, and I like it like that!

This was a very fun journal to make, and I’m very excited to be able to fill it up with different holiday related things over the next few weeks. It’s definitely one of my favorite things to do this time of year. If you want to be notified of new art journal videos, be sure to subscribe to our YouTube channel.
I hope this tutorial and video gives you some ideas and inspiration for creating your very own Christmas junk journal for the holidays. You don’t need a lot of fancy supplies – use whatever you have and what you can find!
If you do make a Christmas themed junk journal, I would love to see what you create! You can share your work anytime in our Artjournalist Facebook group.
Not on Facebook? You can always tell me about your project in the comments section below. 🙂
And as always, if you have any questions on how to make the journal or what supplies I use please do ask away, I’m always happy to help!
Join our facebook group!

Share what you’re creating and working on, ask questions + connect with over 4000 creative artjournalists for inspiration + ideas!
I like your journal! Especially the part about getting it ready now 🙂
I just wanted to mention that projects like this are a really fun way to use up all of those pretty scraps of holiday wrapping paper that some of us tend to hold onto because of happy memories or because we don’t want to ‘waste’ it (ahem that might be me too, just saying…)
Thank you so much for the inspiration and happy holidays!!
That is a great idea to use the wrapping paper scraps – I also like to add in Christmas cards we get throughout the month also. 🙂
I love your ideas. I also love to include little houses and trees in my journals! Thank you -Tricia from Greenbelly Studios
Love the idea of making a journal out of paper you already have! Love the different sizes and folded pieces and the way you bound your journal. This is a great idea! Thanks for the inspiration!