
One of the ways you can truly customize and personalize your own planner organizer is to learn how to make your own planner stickers.
In this tutorial, we’ll share some tips and tricks for creating your very own DIY planner stickers!
Here’s What You Will Need to Get Started to Make Your Own Planner Stickers
Planner Sticker Paper: We use and recommend Avery Sticker Project Paper – which you can find in most retail and office supply stores, but the best price we’ve found for it is online.
Printer w/Ink: You don’t need an expensive printer – inkjet will do just fine, but you will want to make sure that the ink is full! Otherwise your stickers may not come out as clear or beautiful as you’d like! We have a color laser jet printer we absolutely love – but inkjet will work OK too.
Word Processing or Photo Editing Software: If you have photo editing software such as Adobe Photoshop or Adobe Photoshop Elements, that is what we recommend to use to create beautiful sticker sheets. While there’s a bit of a learning curve in using the programs if you’ve never used them before, it gives you the most flexibility and control over how to place and resize images.
However, you can make awesome sticker sheets in word processing programs like Microsoft Word and Pages…so don’t panic if you don’t have Photoshop! We will actually share in this tutorial how to do it in Microsoft Word, and the directions will be similar for just about any word processor {ie: Pages, Open Office, etc.}
Images: You can find a number of cute images on sites like Pixabay.com, OpenClipart.org, and other free printable images sites.
Those types of high resolution images perfect – or if you’re handy with Photoshop, you can always design your own!
If you’d like to skip designing your own planner stickers for now, you can also grab our free printable page flag planner stickers to try it out with!
All righty, got everything gathered up? Let’s have some fun!
How to Make Printable Sticker Pages in Microsoft Word
These directions will work in almost any type of word processing program – Microsoft Word, Open Office, etc – You don’t have to use any special software – if it allows you to set up margins and cut/paste or add text or images it will work!
1. Gather Your Images: The first thing to do is download and save your images that you plan to use. Most sites have a “download” button, or you can just alt-click on the image and choose “save image as…” somewhere on your computer. Be sure when choosing images you have the permission to use them!
2. Set Up Your Page Layout: Next, you want to get the most out of your sticker sheet, so set the margins for the page to be 1/2 inch – this will give you a little more space to work with, but still give you enough room for error in printing. This can be done by going to Layout -> Margins -> Narrow .5″. {In older versions, it may be under the File Menu or “Page Setup”.
3. Insert Photos: If you go to the “Insert” menu, choose “Photo-> Photo from File” from the drop down menu, this will prompt you to find where you saved the images and to insert them into the document.
4. Resize and Rearrange: Once you have the image inserted, you’ll want to resize it so it’s the right size {depending on the image and what you plan to do with it!} – for example, if printing calendar stickers, you might want to make them teeny tiny. Microsoft Word will tell you the size of the image, so this helps in making sure your stickers are the same size. If you need help with the measurements, you can also aways go to the View menu to show the Rulers.
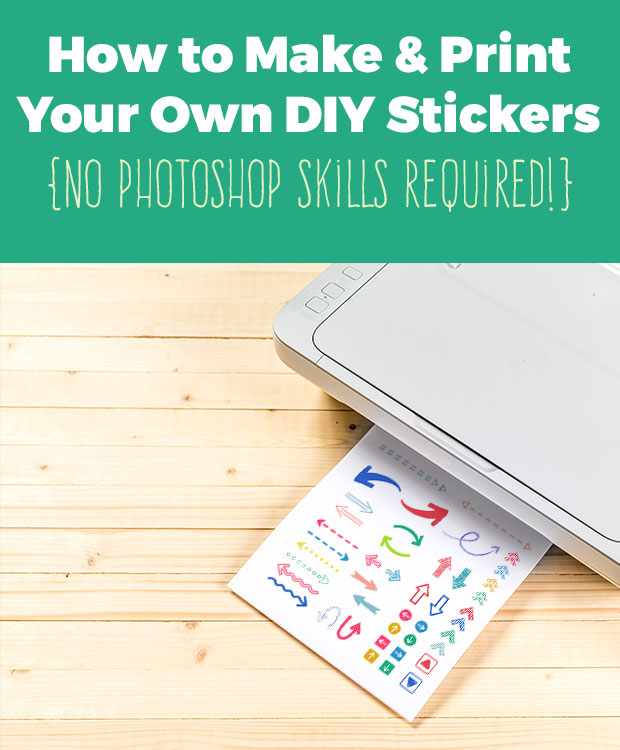
5. Load the Sticker Paper in Your Printer: As this will vary for nearly everyone, follow the directions that come with the sticker paper and/or your printer. Be sure the “sticker side” of the sticker project paper is on the right side for printing.
6. Print! This is the fun part…printing them out!
7. Cut out & have fun! Once you have the stickers printed, all that’s left to do is cut them out and have fun! This can be done VERY easily by either using a Silhouette Curio or Cricut Air or of course you can also cut with scissors.
I hope you find this little tutorial on how to make and create your very own sticker sheets helpful and useful!
And most importantly that it gives you the opportunity to make your planner as personalized as you want it to be – because that is what matters, finding something that works best for you!
I do have one small little word of warning: creating your own stickers is kind of addictive. You’ll be making DIY planner stickers for every project you can think of!!!!
What are Your Thoughts?
Do you have any suggestions for creating your own planner stickers? What methods do you use to make your own stickers and elements for your planner?
If you have any tips you have that I might have missed, please do share them in the comments below!
Join our facebook group!

Share what you’re creating and working on, ask questions + connect with over 4000 creative artjournalists for inspiration + ideas!
